Docker 入门
Docker的工作原理: Container
To start with
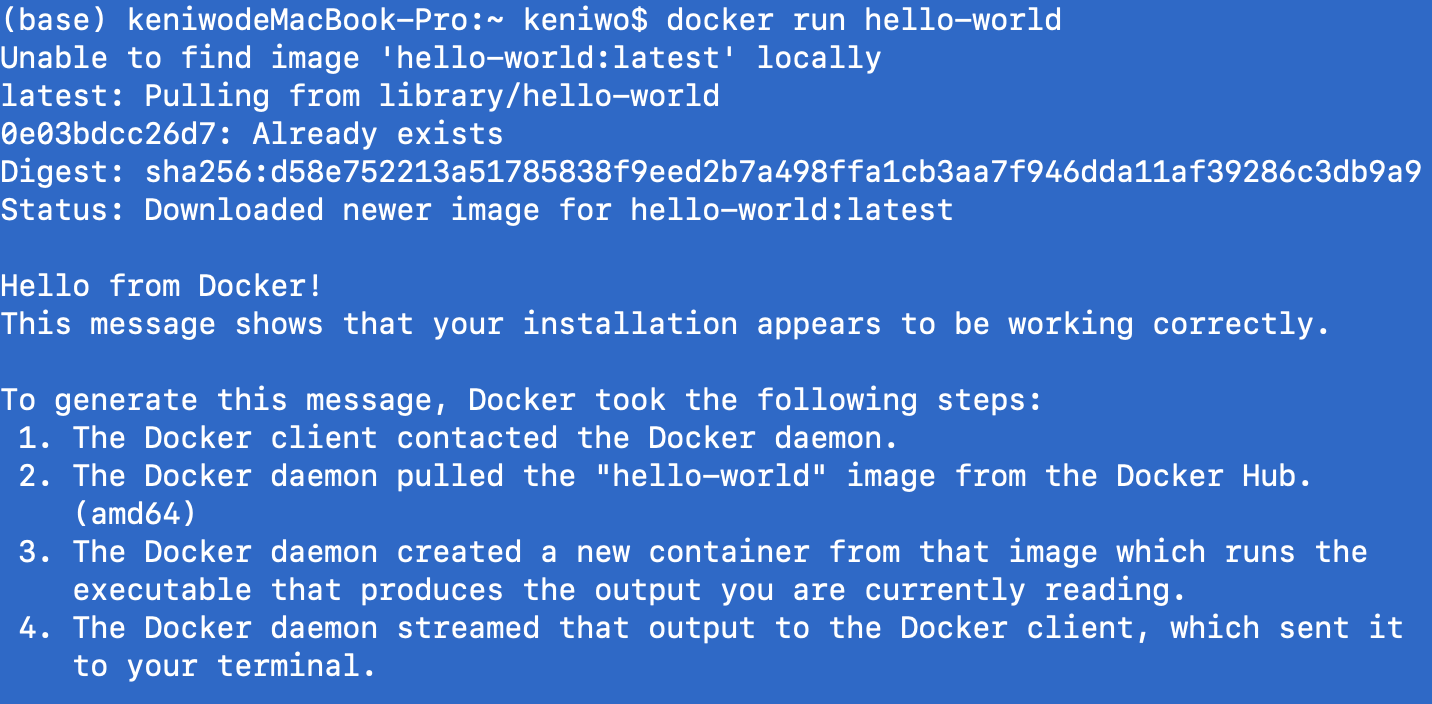
我们可以从 $docker run hello-world 的helloworld程序的流程看出。
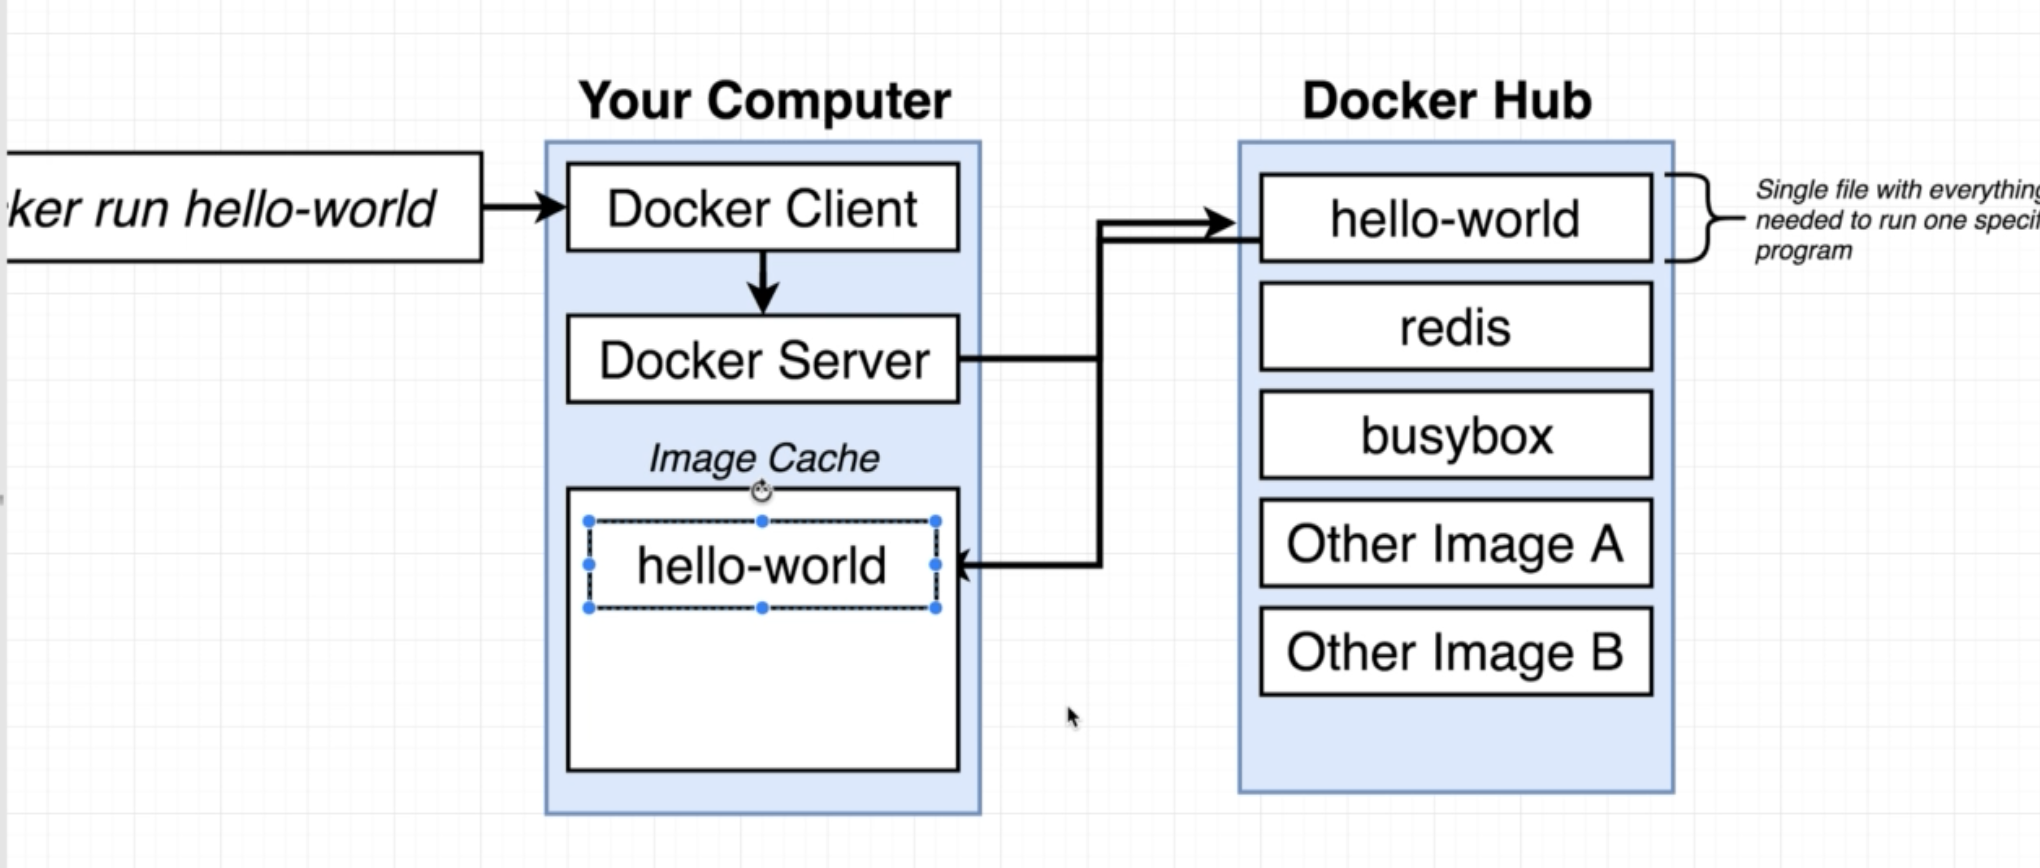
当我们从Terminal输入语句执行的时候,docker client会take 我们的command,然后把command传递给docker server,在hello-world这条command中,我们实际想要传达的意思是我们set up一个新的container,using the image hello-world。 hello-world image实际上包含着一个能打印如下info的小程序,是我们想要利用docker达到的运行的目的。
Docker server在接受到我们的指令之后,它首先会check 我们的image cache,that is,一个可以cache我们的docker image copy的文件库。当我们才刚刚装上docker的时候,image cache是空的,自然也就没有hello-world的copy,所以这时docker server就会向远程的docker hub发出pull请求,向我们本地的电脑上安装这个image。这里,docker hub is a repository of free docker images that you can freely download and run on your pc,就像是apt-get或者homebrew这样的包管理器一样。
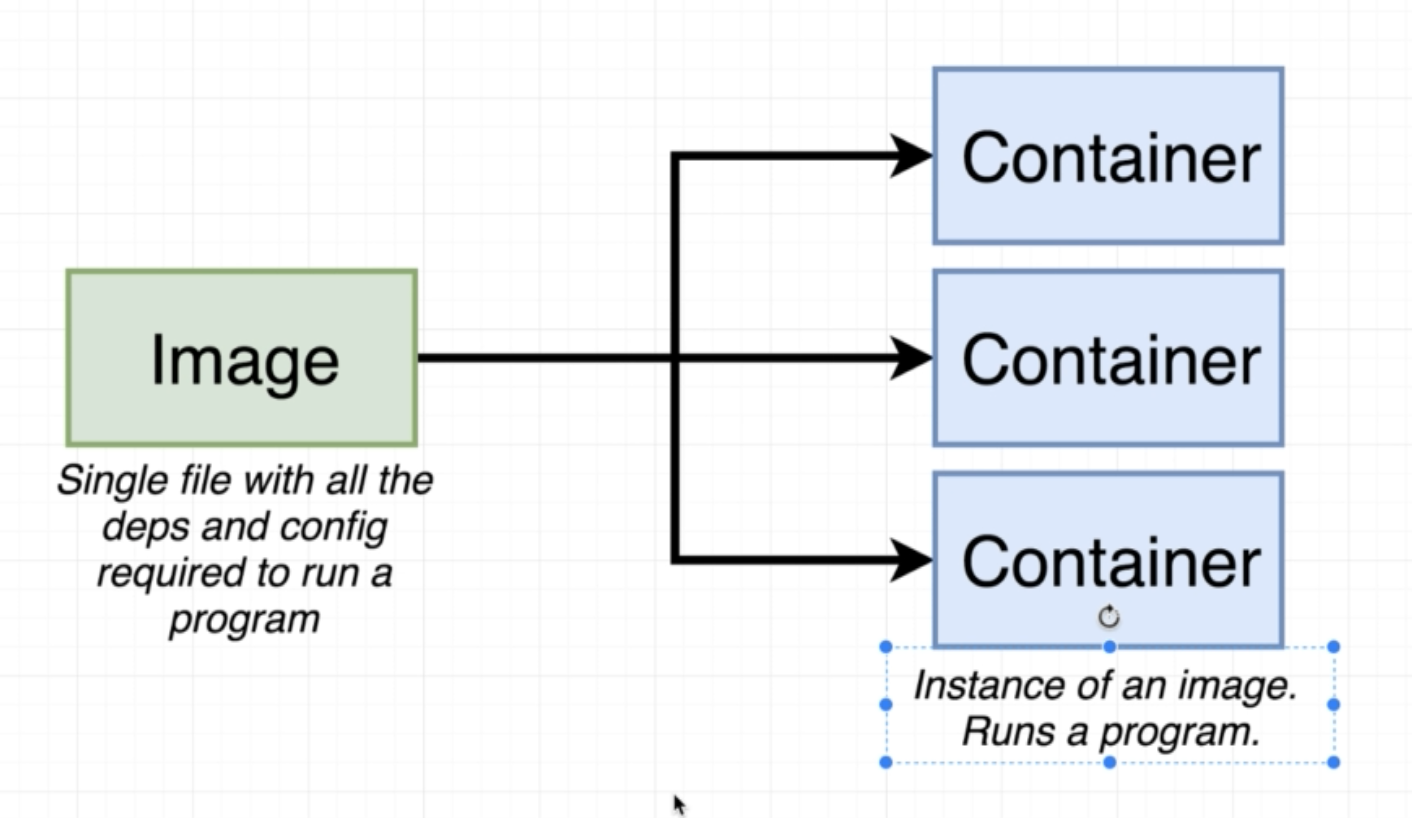
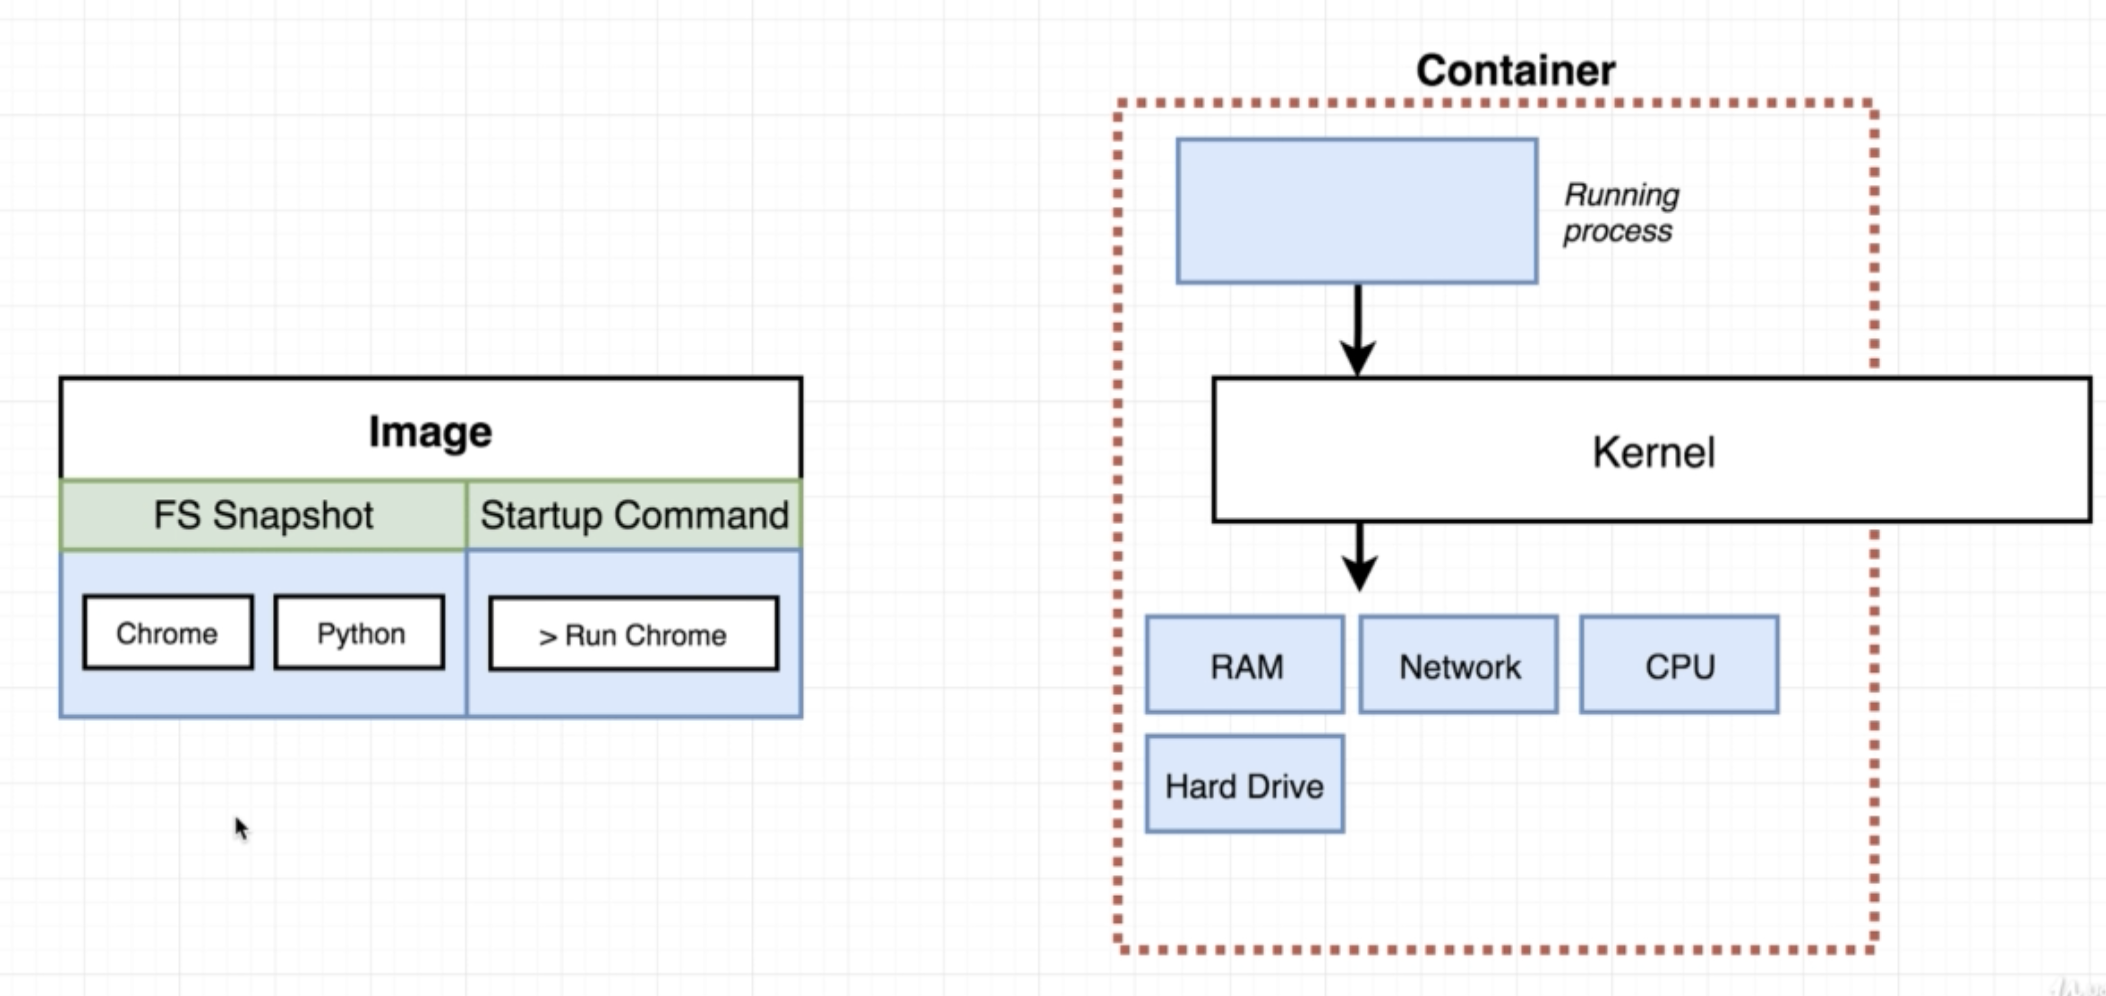
再之后,docker 会创建一个container,container是image的一个instance,他们之间的关系如上图所示。
Understanding Container
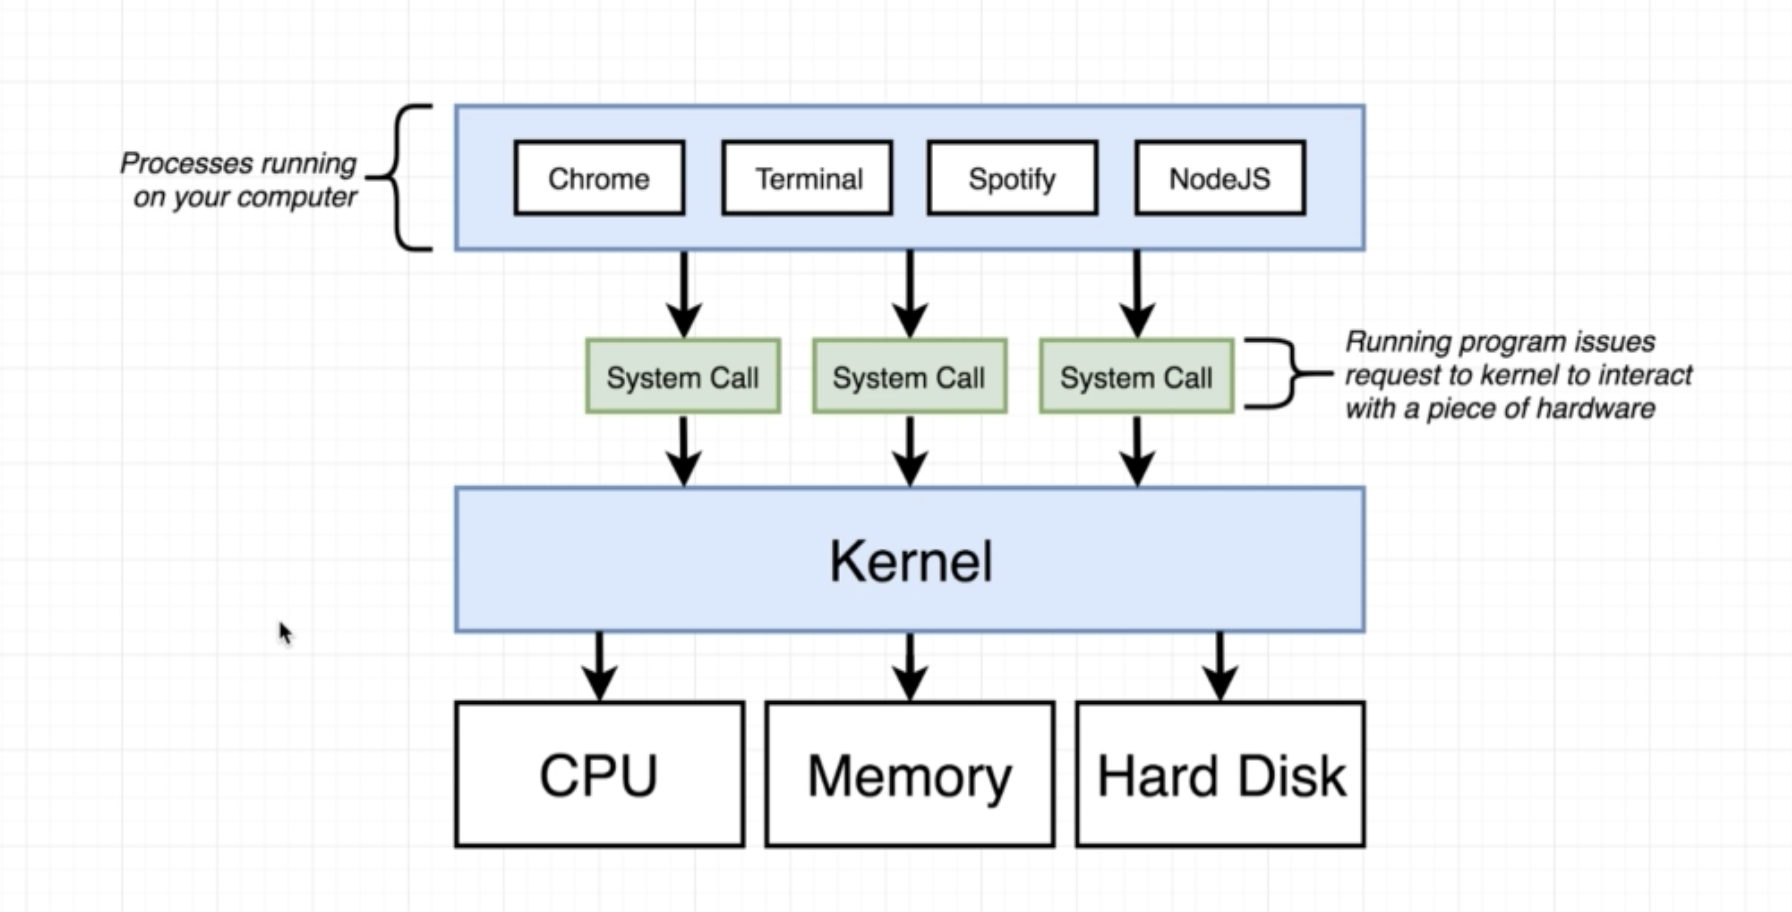
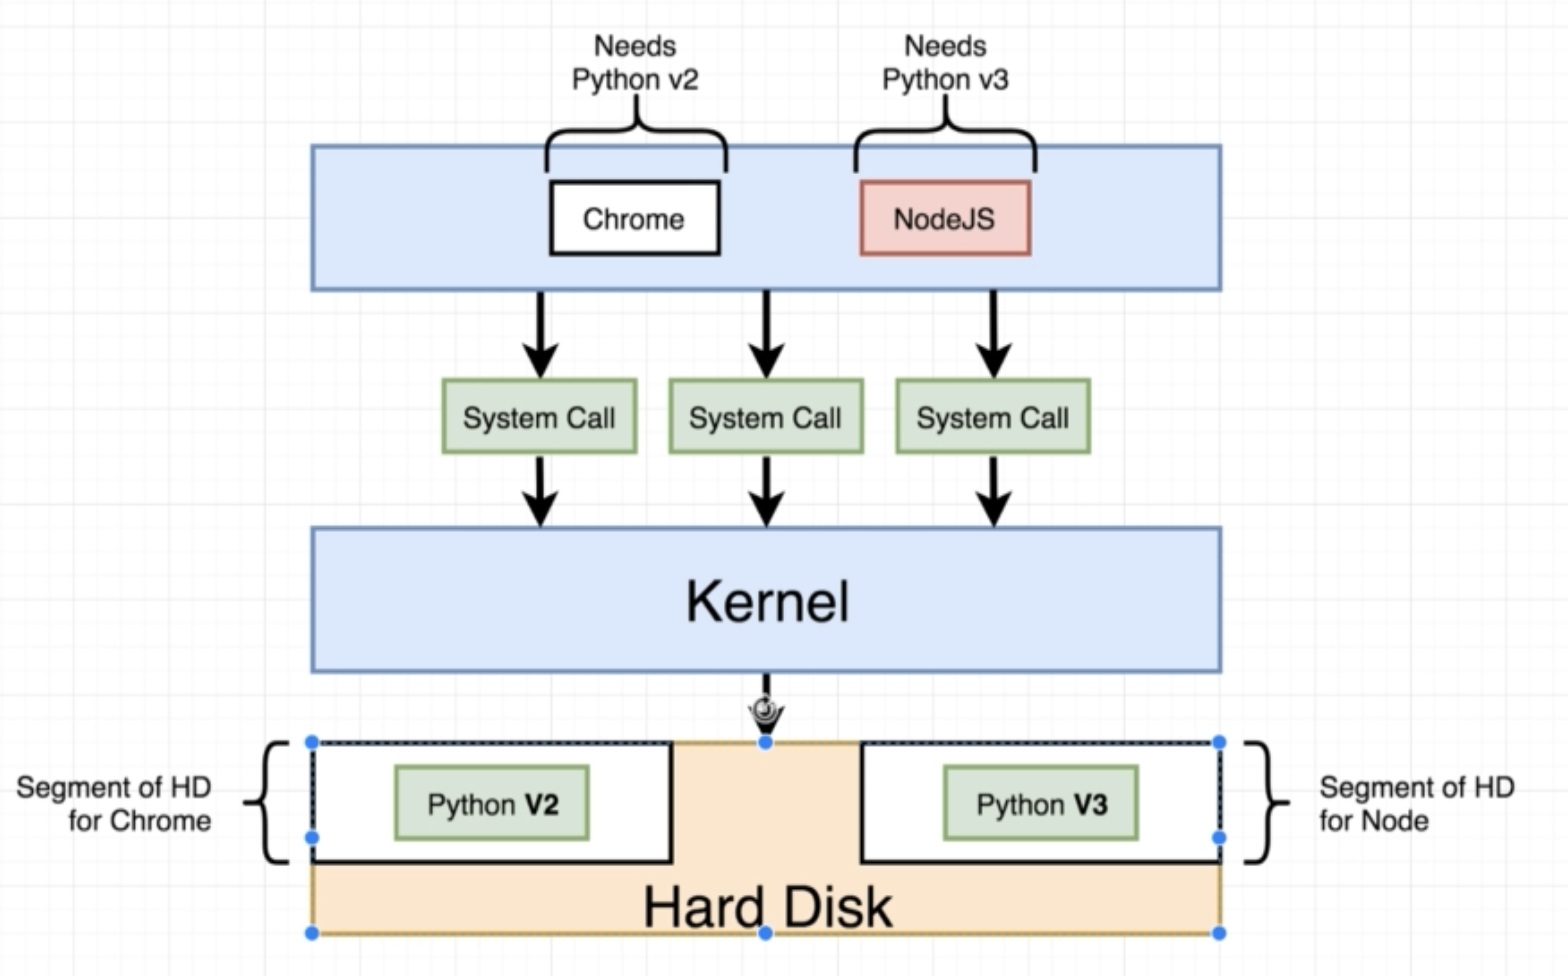
Docker的核心理念就是模仿我们的OS,所以,我们要先理解自己PC上的OS的结构(参见csapp, cmu 15-213)。每一个运行在我们os里的application或者process,当它们要调用cpu或者hard disk的时候,它们是没有办法直接与硬件对话的,二是要借助kernel这个中间层,kernel会帮助我们intermediate机器内部的一些访问请求,进程与kernel交互又是依靠system call来完成的,它实际上是kernel的一些endpoint,或者说可以访问特定文件的函数。
当我们PC上两个进程,let’s say chrome和Nodejs,它们分别需要使用不同的python version,比方说chrome到现在还在用python
2.版本,而我们的nodejs已经早早地进化到了python version3,这时我们的某个奇葩的操作系统上是不允许有两个不同version的python拷贝的,因为for some crazy reason这两个不同的py版本会产生冲突。
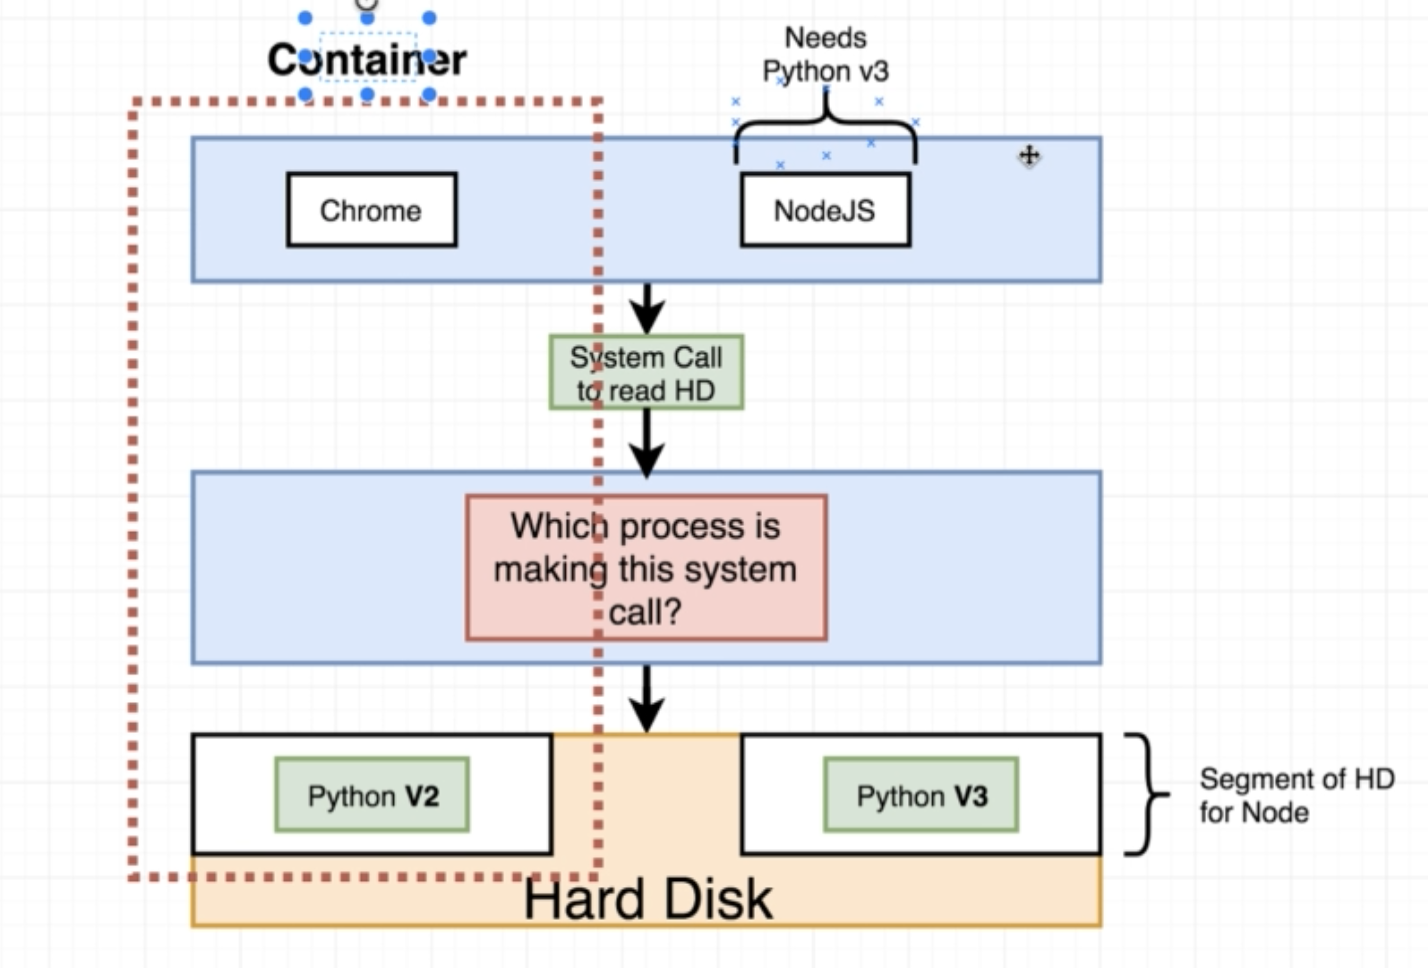
解决这个问题的一个方法是利用OS的一个feature叫做name spacing, 有了name spacing,我们可以直接在HD上划分不同的分区来分别处理这些资源。
这个时候,kernel在处理进程调用的时候,就会先辨识是哪个进程作出的system call,之后根据不同进程的环境需求为进程分配相应的硬件资源。
Name spacing将不同的进程所需的资源隔离开来(isolate),使得它们之间互不干扰。
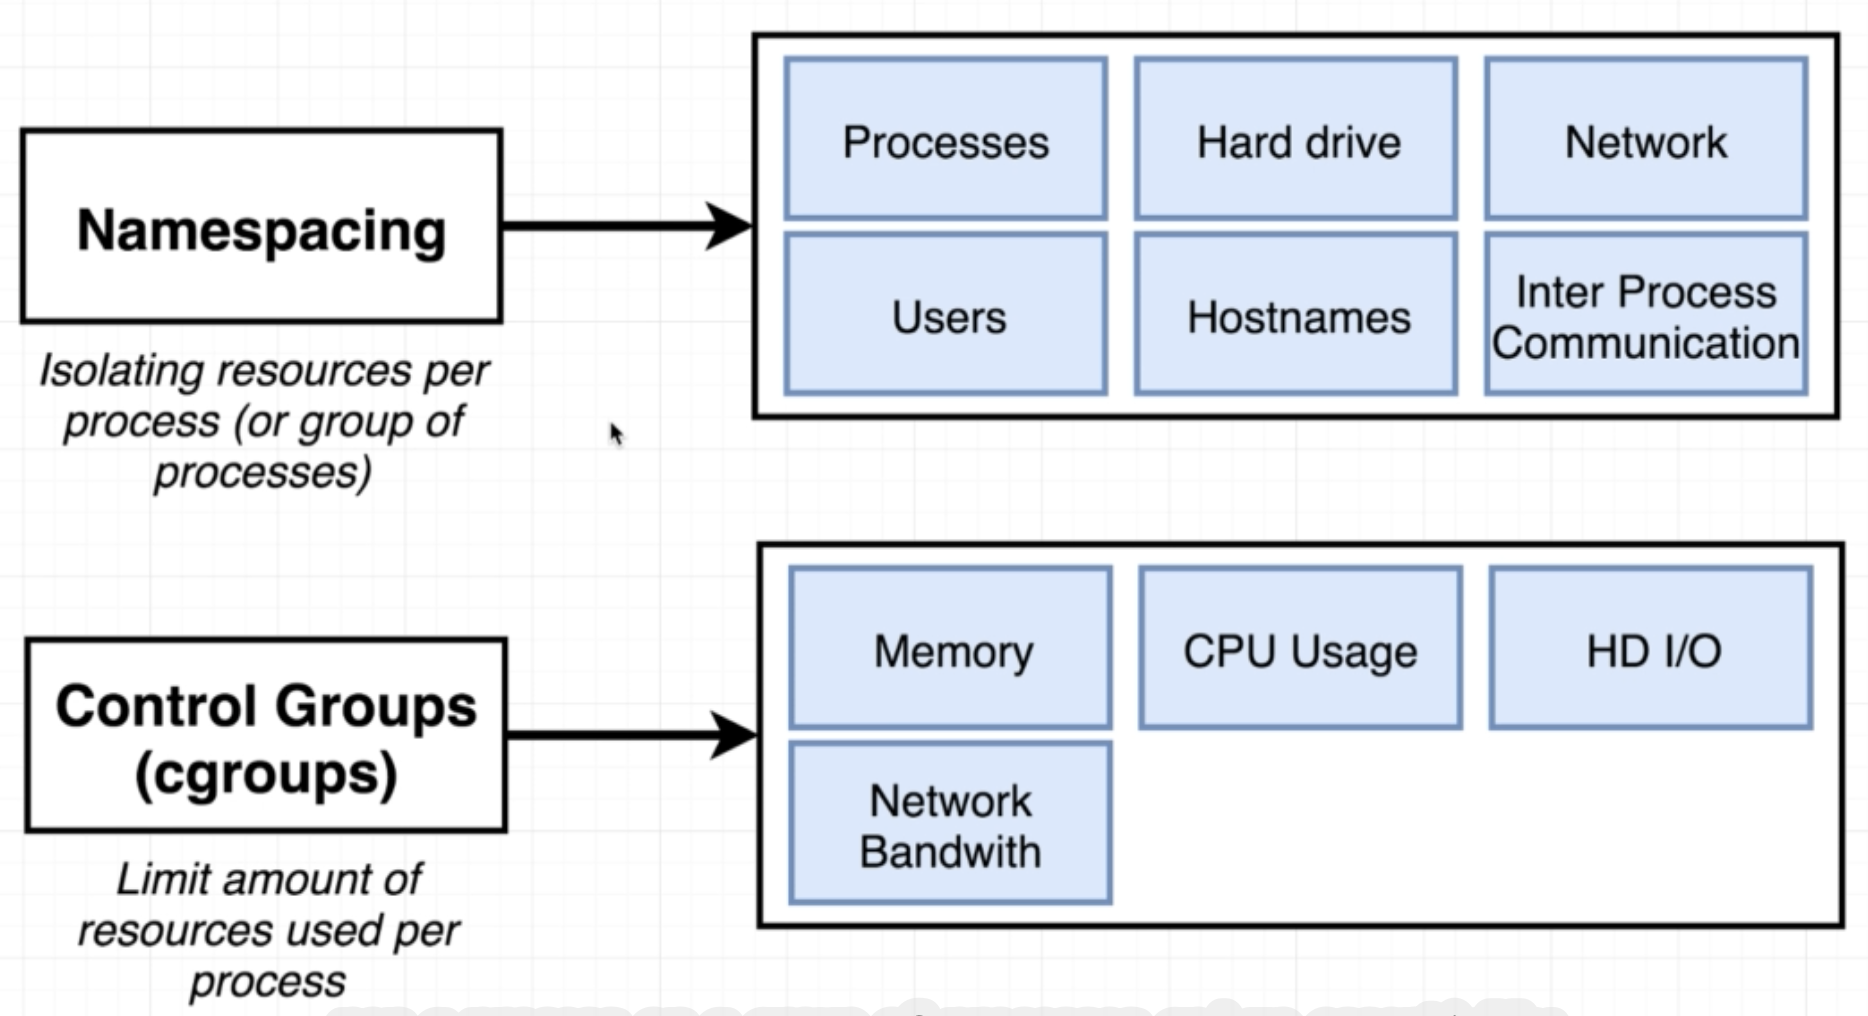
Name Spcacing对应的还有一个概念叫做control group,它能够为每个进程分配有限的资源,比如Memory,CPU usage和bandwidth。
所以,container实际上就是一组被逻辑上划分开来的进程组合,它们可以拥有os分配好的独立硬件资源,供进程使用。
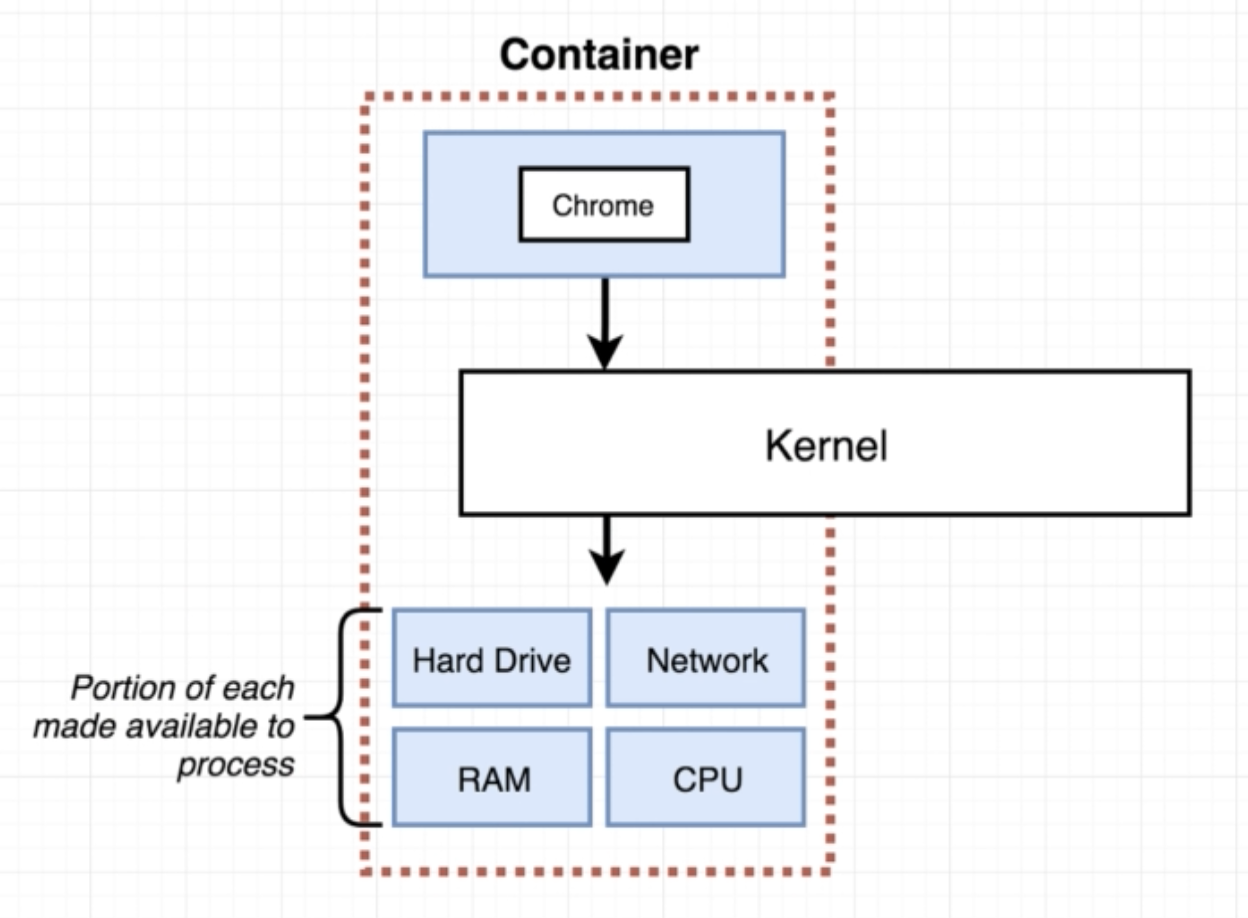
When we talk about image, we’re really talking a file system snapshot, which is essentially kinda like a copy paste of a specific set of directoty or files. And image will also contain a specific startup command. 当我们创建容器的时候,docker会将image里面的文件快照拷贝到container的资源库中,然后执行startup命令,调用chrome或者其他进程,docker运行就开始了。
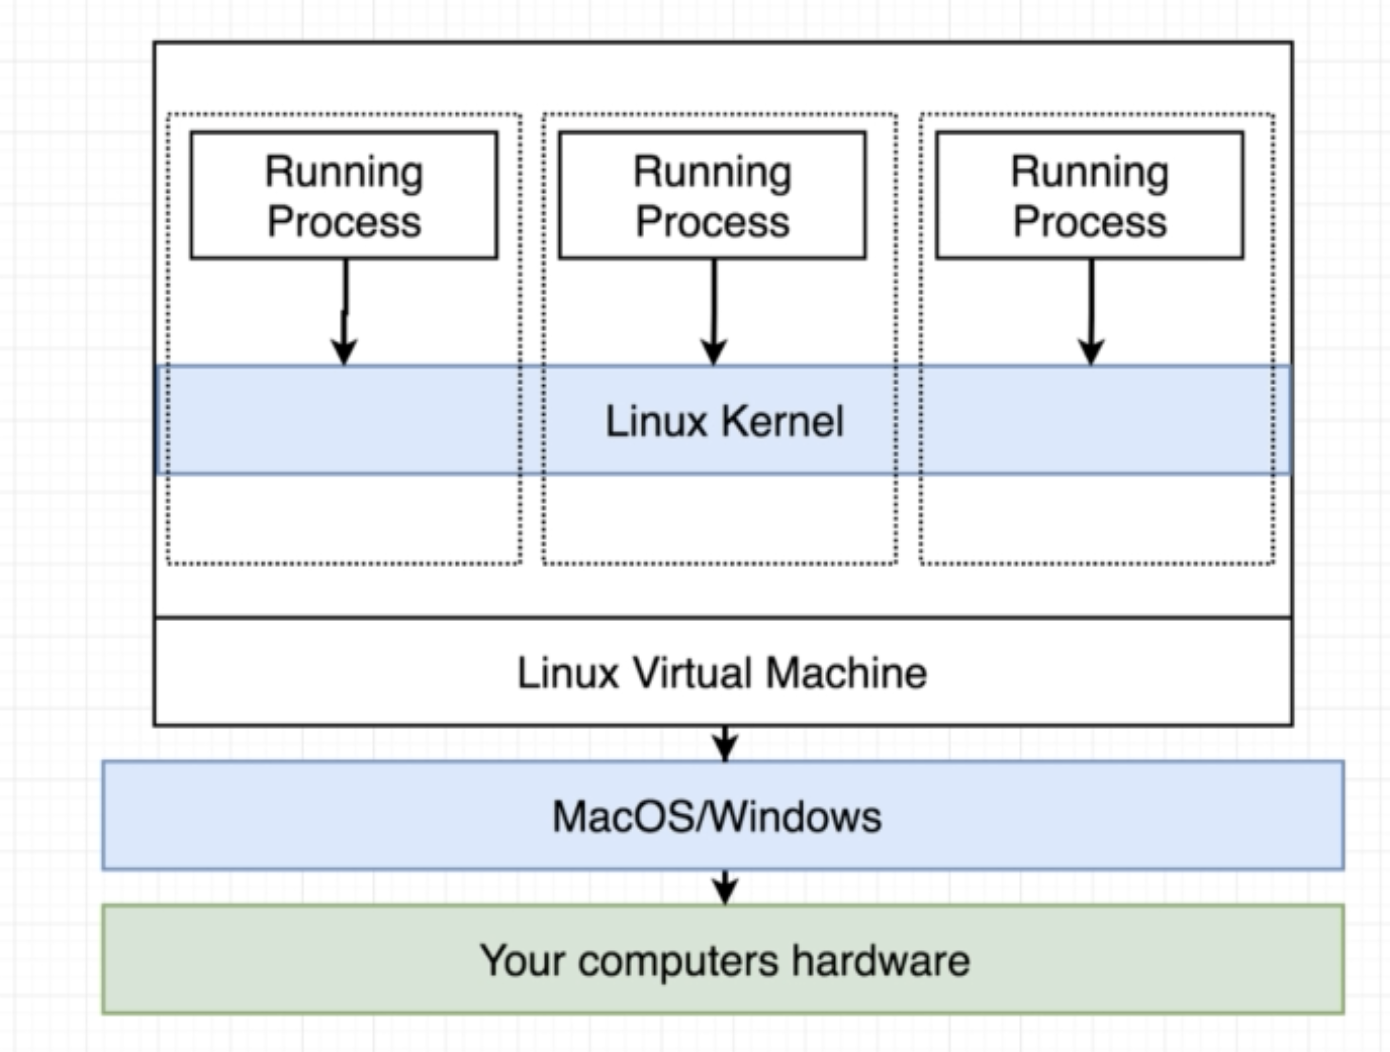
实际上,namespacing 和 control group是linux系统下的一个特性。我们在win或者macos上安装docker的时候,同时安装了一个linux vm,所以我们的container也是在这个linux vm之中创建的,docker内部的系统调用也都是通过vm中的linux kernal来完成的,包括文件系统分区、进程之间的isolating和constraining等。
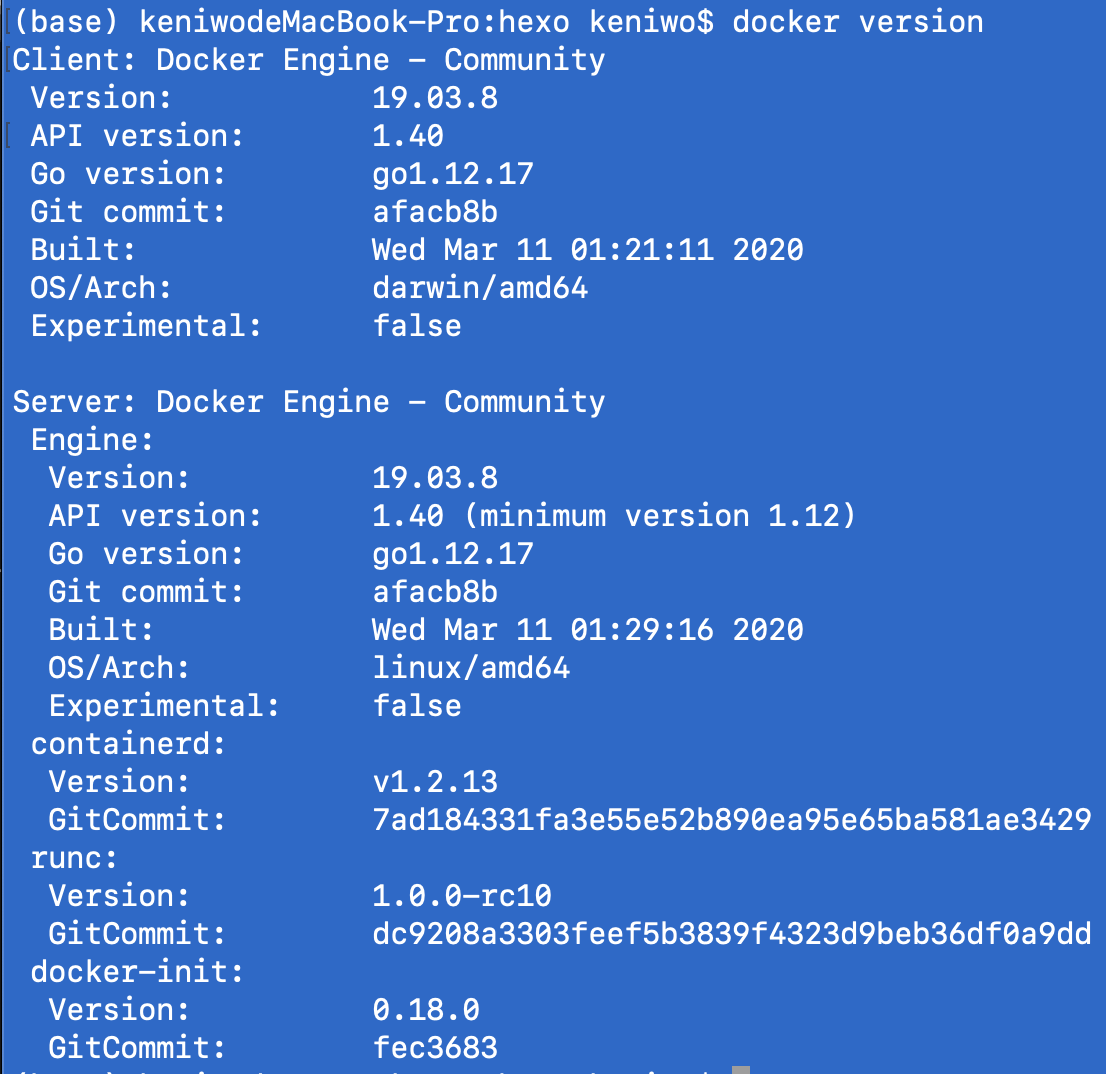
Actually 我们可以打开terminal很直观的看到这个linux vm,只需要输入 $docker version,就可以看到 OS/Arch 一行中显示linux/amd64。
Docker Basic Usages
$docker run <imageName> command
Just like1
2
3
4
5
6
7$ docker run busybox echo hi there
Unable to find image 'busybox:latest' locally
latest: Pulling from library/busybox
91f30d776fb2: Pull complete
Digest: sha256:9ddee63a712cea977267342e8750ecbc60d3aab25f04ceacfa795e6fce341793
Status: Downloaded newer image for busybox:latest
hi there
Also, 我们也可以使用ls命令1
2
3
4
5
6
7
8
9
10
11$ docker run busybox ls
bin
dev
etc
home
proc
root
sys
tmp
usr
var
但是在hello-world中使用ls和echo则会报错,这是因为ls和echo是只存在于busybox中的两个exec。
在这里要特别介绍一下busybox,下面贴出其官方introduction
Coming in somewhere between 1 and 5 Mb in on-disk size (depending on the variant), BusyBox is a very good ingredient to craft space-efficient distributions.
BusyBox combines tiny versions of many common UNIX utilities into a single small executable. It provides replacements for most of the utilities you usually find in GNU fileutils, shellutils, etc. The utilities in BusyBox generally have fewer options than their full-featured GNU cousins; however, the options that are included provide the expected functionality and behave very much like their GNU counterparts. BusyBox provides a fairly complete environment for any small or embedded system.
stackoverflow:
A Busybox docker image is useful if one is building a container for which busybox can fulfill its dependency chain without needing a full Linux distro.
Often, an embedded appliance can consist of nothing but a statically-linked copy of busybox, an init script that mounts procfs, sysfs, &c. with busybox-provided tools, and then the actual application being invoked. With docker setting up the filesystem namespace, even that init script isn’t necessarily needed.
docker ps
List all the running containers that are currently on your machine.
1 | $docker ps |
这条命令只会显示所有当前正在运行的container。如果要显示所有运行过的程序的话,我们需要1
$docker ps -all
Container lifecycle
实际上, docker run = docker create + docker start,这两个语句是有区别的。
docker create <image name> 只是创建了container,将image里的文件快照拷贝到了container的文件系统里面。
docker start <container id>
当我们使用container id来start container的时候,命令行不会输出container具体的运行结果(output),而是echo给我们同样的containerId,所以,如果我们要在start的时候看到输出的话,需要加上 -a 参数。
docker start -a <container id>
另外,每次start container id的时候,我们的容器都是默认使用create/run时候的default command,并执行default command。比如说,我们执行$docker start -a <cont id>的时候,命令行输出依然会显示hi there,实际上是又执行了一次我们的default command echo hi there.
所以start的时候是不能重新指定命令的。
Remove stopped containers
$docker system prune
会清除所有运行完毕的container,也会清除所有docker cache里面的镜像,这样的话再次使用镜像就要重新向docker hub提出pull请求。
Retrieving log outputs
$docker logs <container id> will get logs from a container.
当我们执行docker logs的时候,我们不会重新运行该容器和其默认命令,而只是查看他的历史输出。
Stopping containers
如果我们用docker start在后台运行container的时候,是没办法用ctr+c结束进程的,常见的有ping google.com这样的命令,这时候就需要其他的命令来结束容器进程,有以下两种方式。
docker stop <container id>
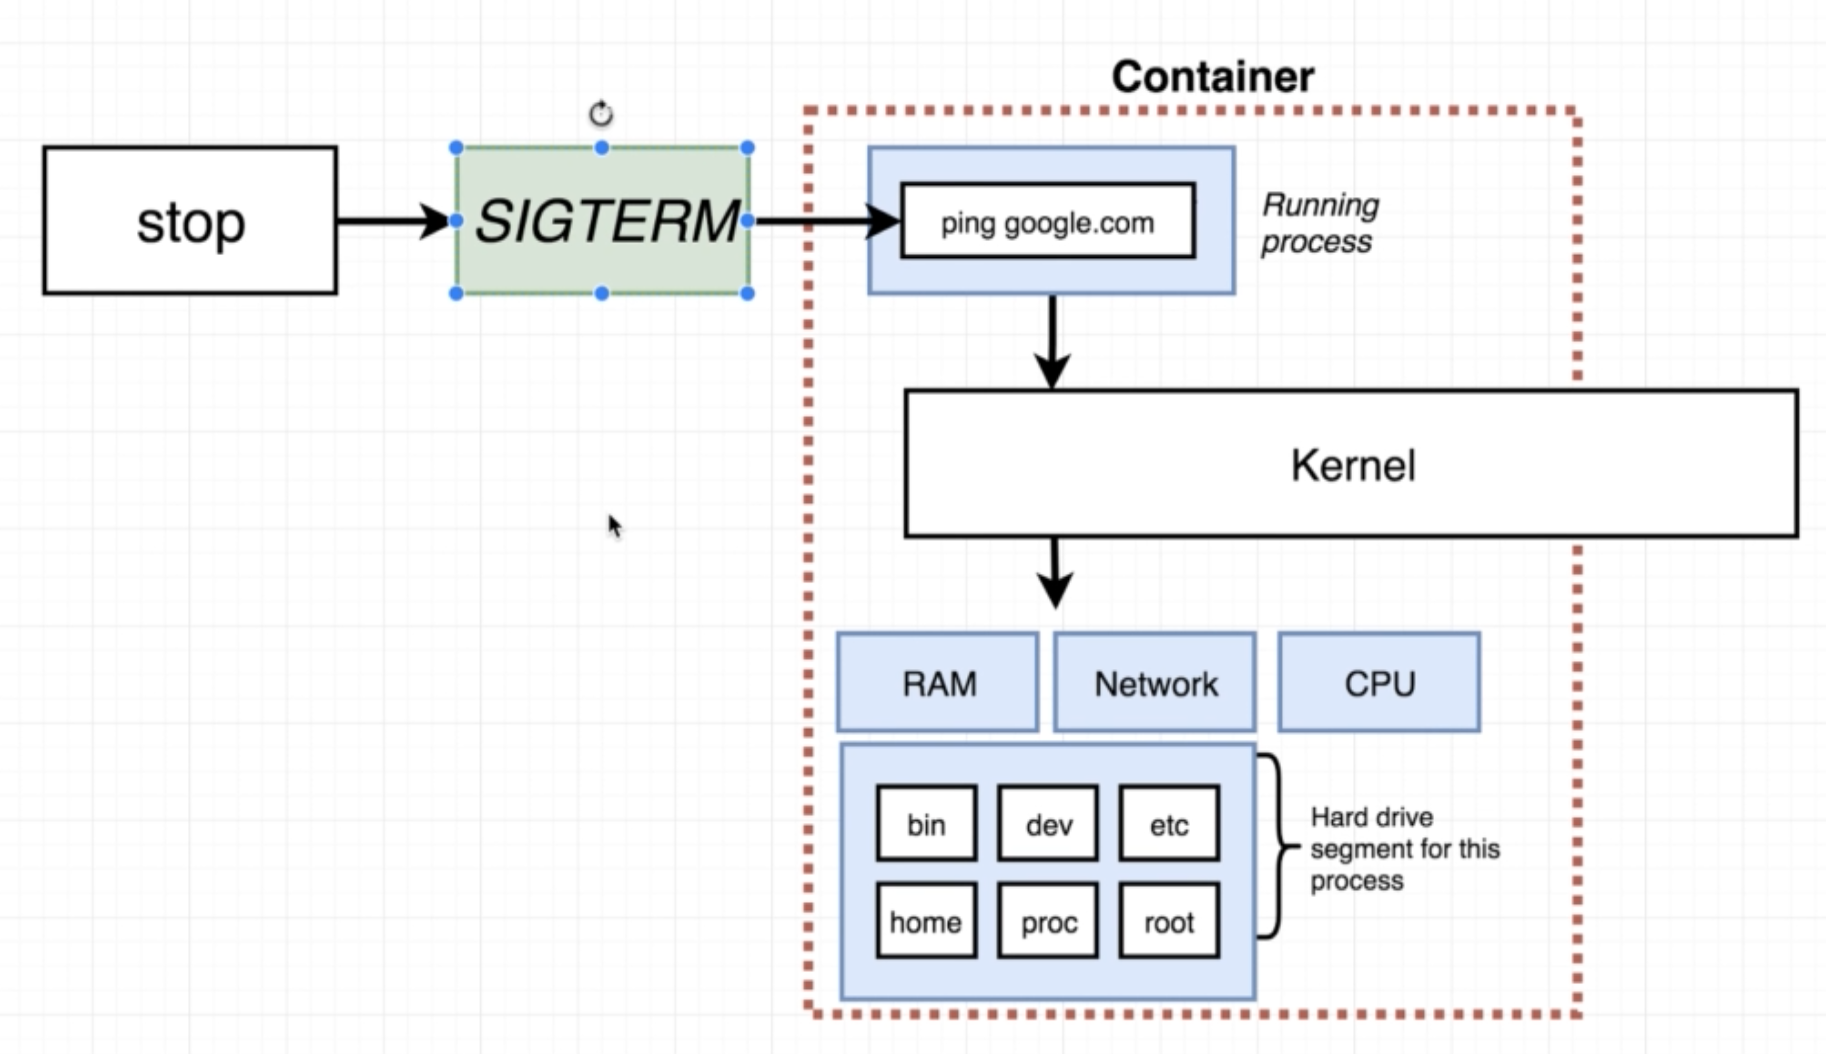
从图中我们可以看到实际上ping google.com 是是隶属于busybox linux系统命令之下的不断loop的一个进程。
当我们使用docker stop的时候,实际上是向该进程发送了一个Terminate的Signal,进程收到signal之后就会shutdown,但在这之前还会留有一些短暂的准备时间,让container做做简单的清洁。
docker kill <container id>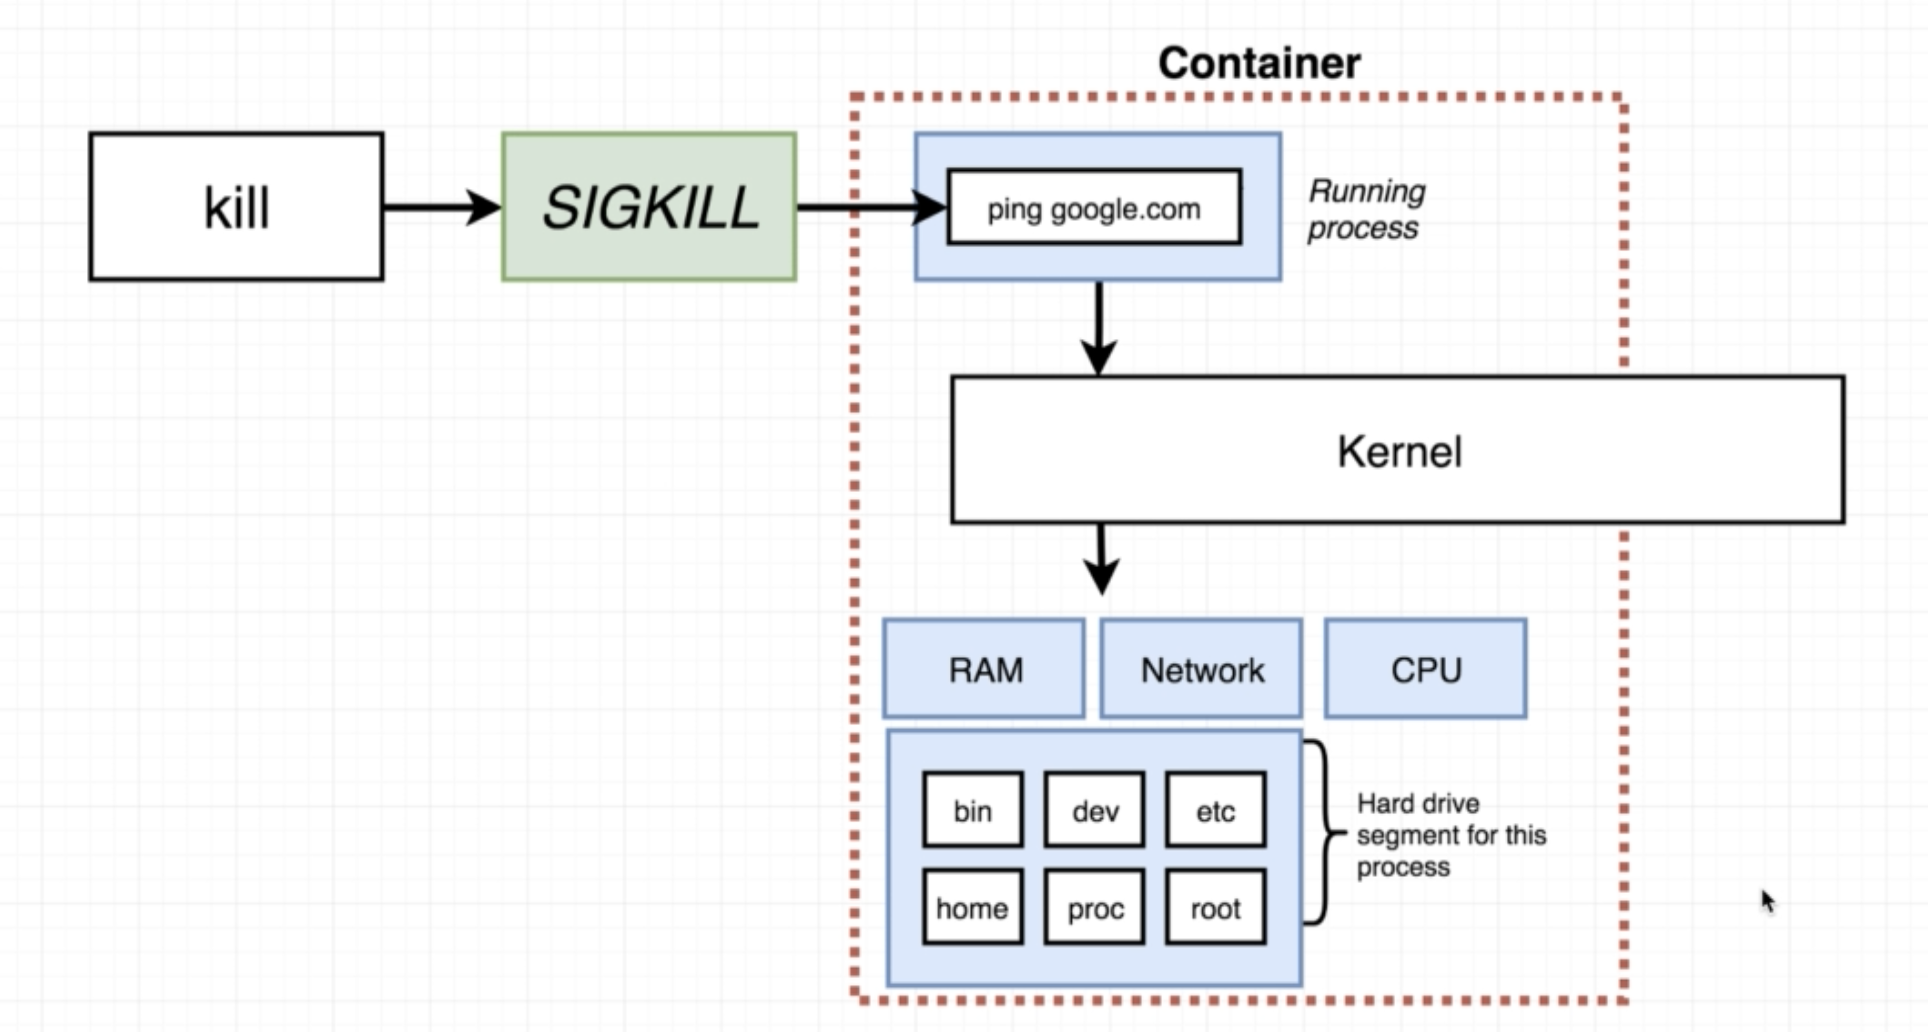
同样的,docker kill也是发送一个kill的命令,这个kill的命令会立即shut down进程,而不做其他的考虑。
so usually we use stop command, and when using that, we re gonna wait a couple of seconds until the process shut itself down. Similiarly kill command will just kill the process instantly with no waiting time.
Execute commands in running container.
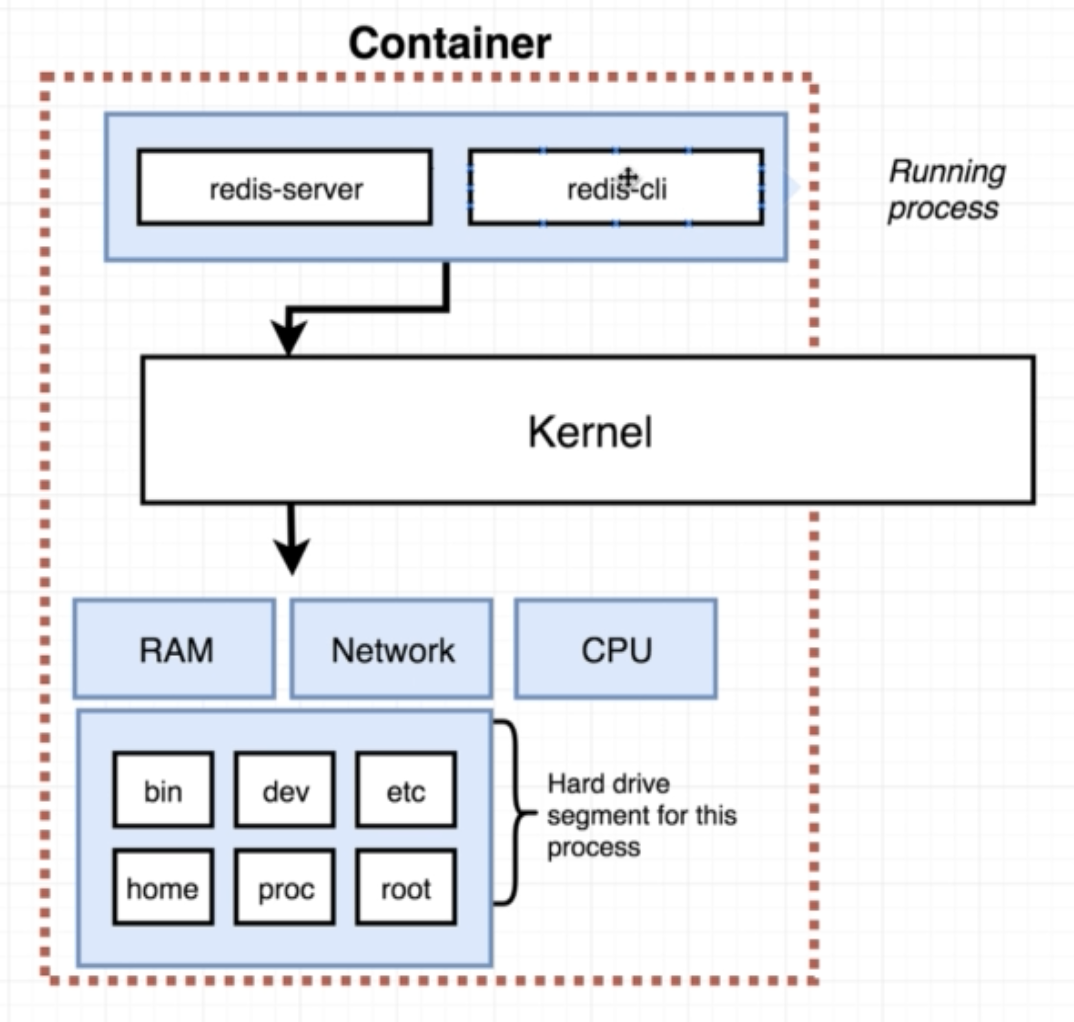
有时候我们需要同时在一个container里面运行多个进程,比如说redis-server和redis-cli,这里就要用到执行命令。
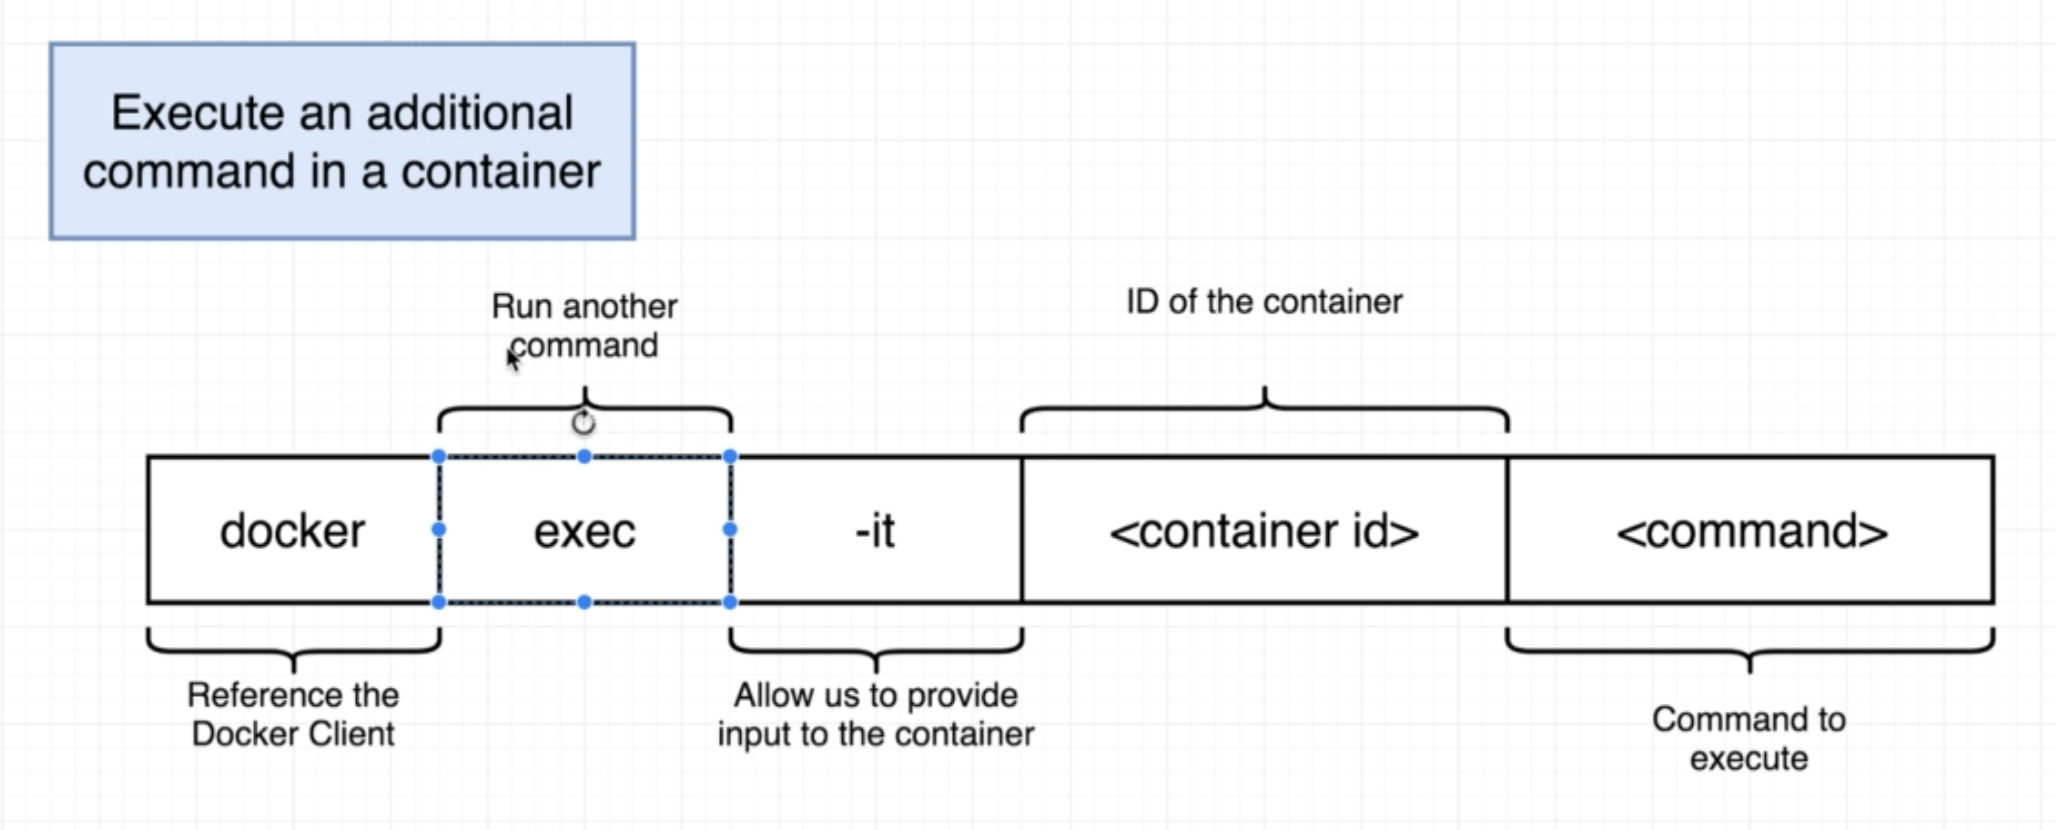
docker exec -it <container id> <command>
1 | $docker run redis |
the usage of the -it Flag
在上面例子中,如果我们leave out -it 的话,我们会被立刻kick out back to terminal,而不会显示redis-cli的交互界面。